Introduction to HTML
Published on 2018-09-03
Web development refers to creating web sites or web applications that work on the Internet or in a local network (for example, a company application that tracks sales). There are several popular open source technologies, software solutions and development environments that can be used to develop and host web applications, and in this course we will focus on several of them.
HTML (or Hypertext Markup Language) is the standard language for creating web pages and describing it's structure and contents. Naturally, we will start our discussion with HTML, as it is a cornerstone technology for the World Wide Web. All browsers understand HTML. Afterwards, we will continue to discuss web development by focusing on Cascading Style Sheets (or CSS) so that we can easily style web pages. We will also introduce JavaScript, which is a scripting language that affects the behaviour of web pages (for example, maybe we want to alert a user that some action was stopped for whatever reason).
If this sounds too complicated, don't worry about it for now. After you understand the basics of HTML, the other two technologies (CSS and JavaScript) will be much easier to comprehend. For now, let's just mention that HTML is used to define the structure and contents on a web page, CSS is used to define the look and feel, while JavaScript allows us to make interactive web pages.
Frontend and backend
You might have heard the terms "frontend" and "backend" before - i.e. when other people talk about web development. The term frontend refers to the technologies I've mentioned above (HTML, CSS and JavaScript running on web pages). Frontend basically means that we're talking about the stuff running inside the user's browser - or, in other terms, that we discuss the graphical user interface that a user interacts with. Backend, on the other hand, refers to the work done by the server that is hosting the data - for example, when we access Facebook, there is backend logic for storing our conversations, images, etc.
For now, it's enough to understand that these terms refer to the separation of concerns between the graphical user interface and the server that is hosting and serving data for our applications.
What is HTML?
As we mentioned above, we're going to start our web development course by discussing HTML, which is a markup language for describing web pages. In practice, HTML documents are text documents which can easily be understood by web browsers - i.e. web browsers such as Google Chrome and Mozilla Firefox can read HTML documents and display them.
Each HTML page consists of several HTML elements (heading, text paragraph, table, image, etc - depending on what we want to display on the page). In HTML, we use tags to outline what element(s) we want to show on the page. Browsers read the tags (for example, "<p>This is a paragraph</p>") and present the content appropriately (in this example, that would mean a text paragraph with the content "This is a paragraph"). Let's see an example of a complete HTML page:
<!doctype html>
<html lang="en">
  <head>
    <title>Our first page!</title>
  </head>

  <body>
    <h1>This is a title!</h1>
    <p>This is a paragraph of text.</p>
  </body>
</html>
I know this example might look complicated at first, but don't be scared. We're going to describe everything in a minute. Similarly, you should know that some of the content presented above (for example, the first line) will be exactly the same on all of your pages (say, when you create a website for a pizza delivery service with multiple pages for ordering items, contact details, etc). So, you'll get used to it pretty quickly.
Let's do a short overview of the document we presented above. If you look more closely, you'll see the document consists primarily of two parts (head and body). Each page will contain both a head and a body. The body contains the elements that are actually rendered on the page (in this case, a header h1, and a paragraph p), while the head contains meta information about the document. For example, the title element tells the browser what's the title of the page, and the browser will therefore present that text above the page (so that, if a user has multiple tabs open in his browser, he'll know what each tab is about).
The key takeaway here is how each element is defined using "tags". HTML tags normally come in pairs of an opening tag (for example, "<p>") and a closing tag (for example, "</p>"). This way, the browser knows where each element starts, and where each element ends. The closing tag (or "end" tag) is the same as the opening tag (or "start" tag), but contains a slash "/" before the tag name. Some examples of elements are paragraphs ("<p>...</p>"), headings ("<h1>...</h1>"), links ("<a>...</a>"), images, tables, lists, etc. We're going to look at a bunch of examples soon.
For right now, let's just remember that an HTML document consists of elements, which are defined using tags. Only elements inside the body section are displayed on a web page. HTML is a simple markup language, and we can edit HTML documents using simple text editors (like "notepad"), or powerful Integrated Development Environments which offer auto completition and detection of typos. An HTML document has a document type declaration ("<!doctype html>"), and then begins with "<html>" and ends with "</html>". Inside those tags, we have a head section (for meta information) and a body section (for describing the elements visible to the user).
Textual elements
Let's start by looking at HTML elements that are used to render text. These are the heading elements (h1, h2, h3, h4, h5 and h6), the paragraph element (p) and the link/anchor element (a). The "h1" tag is used to render the most important heading, while h6 is used for the least important heading. Links are used to link to other pages or documents - a user can click on a link and then go to another location on the same site or on a completely different site (for example, to facebook.com).
Let's look at an example of a HTML page that contains headings, paragraphs and links.
<!doctype html>
<html lang="en">
  <head>
    <title>Text in HTML</title>
  </head>

  <body>
    <h1>We can have a main title.</h1>
    <p>A short description of the book...</p>

    <h2>And then a section.</h2>
    <p>With some details.</p>

    <h2>And a new section.</h2>
    <p>With details related to it, etc...</p>
    <p>We can link to <a href="https://www.facebook.com">another page</a> for more.</p>
  </body>
</html>
A lot of things to discuss here. First, if you look at the example, you should note that things defined in the body are presented on the page in the same order in which we define them - so, there will be an h1 heading on the top, then a paragraph, then an h2 heading, etc. Similarly, each element has a start tag (like <p>) and an end tag (like </p>). This way, browsers know where an element starts, and where it ends.
The last paragraph is very interesting, because it shows us that one element can contain another one (there is a link/anchor "a" element inside the paragraph "p" element). Similarly, you should note how we created and defined a link/anchor (in this example, one that points to facebook.com). Later in this tutorial, we're going to discuss "attributes", which are used to provide additional information about the HTML elements. In this case, the "href" attribute is used to tell the browser where the link points to. Inside the anchor tag (between the start and end tag) we have the text "another page", which defines where the user should click in order for the browser to make a redirect to "www.facebook.com". We're going to talk more about links and attributes below. We will also describe how attributes can be used to modify the font size, color and make other styling changes.
Images, tables and lists
A table consists of rows and columns. In HTML, we create a table with the <table> tag. Inside that, each table row is created with the <tr> tag, and each cell (table data) with the <td> tag. Sometimes, when we create tables, we want the first row to present heading data (like, for example, the column names). In that case, we can use the <th> tag instead of the <td> tag.
Images are created with the <img> tag. Remember how we defined a link/anchor above by using an "href" attribute? Well, for images, we also have to use an attribute - however, when it comes to images, we use the "src" attribute to define the image source.
Images offer us a reason to mention that some elements for which we don't need to setup anything between the start and end tags (for an image we only need to define an "src" attribute), can use self-closing tags <img src="..." />. Please note the / character.
<!doctype html>
<html lang="en">
  <head>
    <title>Tables in HTML</title>
  </head>

  <body>
    <table>
      <tr>
        <th>Name</th>
        <th>E-mail</th>
      </tr>

      <tr>
        <td>Mark Jackson</td>
        <td>mark.jackson@gmail.com</td>
      </tr>

      <tr>
        <td>Peter Norvig</td>
        <td>peter@yahoo.com</td>
      </tr>
    </table>


    <h2>Here is a photo.</h2>
    <img src="/images/lectures/fibonacci.png" />
  </body>
</html>
In HTML, we can also create lists. Lists are defined with the <ol> tag (for ordered lists) and <ul> (for unordered lists). Lists have items, and we define them with the list item tag <li>. This is better explained with an example.
<!doctype html>
<html lang="en">
  <head>
    <title>Lists in HTML</title>
  </head>

  <body>
    <p>Ordered lists</p>
    <ol>
	    <li>Item 1</li>
	    <li>Item 2</li>
	    <li>Item 3</li>
    </ol>


    <p>Unordered lists</p>
    <ul>
	    <li>Item 1</li>
	    <li>Item 2</li>
	    <li>Item 3</li>
    </ul>
  </body>
</html>
Pretty easy right? Notice how ordered lists have numbers (i.e. items have ordering), while unordered lists are not numbered. Make sure you practice HTML elements a bit by creating a couple of headings, paragraphs, images, tables and lists. In an hour or so, they will feel easy and intuitive.
CSS Basics
Often, we want to change the styling of an element - i.e. maybe we want to make the font bigger, or change the color of the text, etc. Cascading Style Sheets (CSS) is a language used to modify the presentation of HTML elements. The simplest way to modify the style of an element is through the "style" attribute. Multiple style definitions can be added to the same element inside the "style" attribute by separating them using the semicolon ";" character. Let's see an example:
<!doctype html>
<html lang="en">
  <head>
    <title>Styles in HTML</title>
  </head>

  <body>
     <p>A paragraph with default styles...</p>
     <p style="color: red;">Uh, red color text.</p>
     <p style="color: blue; font-size: 150%; font-weight: bold;">More changes...</p>


     <p>Use spans for <span style="color: orange;">inside</span> changes.</p>
  </body>
</html>
Notice how we use "parameter: value" (for example, "color: red") for each style we want to set. Here is a list of styles you will be using often:
| color | change text color | examples: red, blue, black, white, gray, orange, etc |
| background-color | change element background color | examples: red, blue, black, white, gray, orange, etc |
| font-size | change font size | examples: 50%, 100%, 200%, 15px, 30px, etc |
| font-weight | change font weight | examples: normal, bold, etc |
We're going to discuss margins and padding in the following sections (two other common styles you might want to change).
Block and inline elements
You might have noticed some differences between the HTML elements we mentioned so far. For example, paragraphs seem to stack one below the other, but that's not true for all elements. Similarly, we were able to put some elements into others - for example, a span inside a paragraph, in order to change styles. To fully understand how our web pages are going to be rendered, we first need to look at the difference between "block" and "inline" elements.
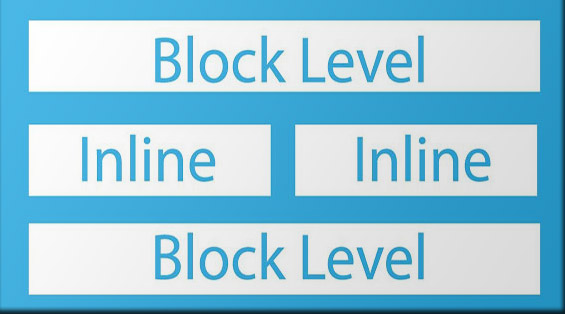
In short, block-level elements (like, paragraphs and tables) start on a new line and take the full available width (i.e. the entire available space from left to right). On the other hand, inline elements (like images, links and spans) take up as much width as needed, and don't start on a new line. We've already seen several examples with both paragraphs, tables and spans, so this should make sense to you.
With CSS, it's possible to change the display style of an element (for example, we can make an image take up the entire available width). We're going to discuss this in more detail later. For now, just remember that elements are displayed differently on a web page based on their type.
Block elements
Let's see an example featuring block-level elements. We've already played with several block-level elements above, and those include paragraphs (p), headings (h1, h2, h3, h4, h5 and h6), tables (table), lists and list items (ol, ul and li), etc. If you write an HTML document and put these elements one after the other, each of them will be presented in a new row (they will appear one below the other).
One very interesting element is the division or section element (div), as it's very often used inside web pages to create containers for other elements. For example, imagine that you have a web page with several sections (section 1 where you have an intro text, section 2 with some images, and section 3 with some concluding remarks), and you want to color each section with a different background color. Now, imagine that the last section should contain two paragraphs. How do you make sure that the last section has the background color "gray", for example?
One solution is to change the "background-color" style of the two paragraphs. However, when developing web sites, we want to avoid doing things multiple times (as this is prone to errors, harder to change later, etc). The preffered solution is to have a separate div for each section, and change the "background-color" style of the div. The two paragraphs of the last section will be inside the last div, and since we changed the background-color style of that div, both of them will have that color.
<!doctype html>
<html lang="en">
  <head>
    <title>Sections in HTML</title>
  </head>

  <body>
     <div style="background-color: red;">
          <p>This is section 1.</p>
     </div>
     <div style="background-color: green;">
          <p>This is section 2.</p>
     </div>
     <div style="background-color: gray;">
          <p>This is section 3.</p>
          <p>It has multiple paragraphs.</p>
     </div>
  </body>
</html>
The division or section element (div) is very easy to understand once you start thinking about styling your website. We'll be using it often.
Inline elements
We've already looked at several common inline elements. These include links, spans, and images. Let's just list a couple of new elements that you can use: "strong" for making text bold, "sup" for superscript, "sub" for subscript, and "button" for buttons. You can add these in a similar way to spans or links - i.e. they are commonly used inside paragraphs. Let's look at an example below.
<!doctype html>
<html lang="en">
  <head>
    <title>Inline elements</title>
  </head>

  <body>
       <p>Some <strong>bold</strong> text.</p>
       <p>Math is easy: 2<sup>3</sup> = 8.</p>
  </body>
</html>
With paragraphs, we regularly use spans to emphasize text with a different weight, color or size. This helps visitors (who show up at our website).
Entities
Sometimes, we might want to use characters that may confuse our browser - for example, maybe we want to insert the < (less than) character, but that same character is used to indicate the start of a tag (like <p>). Those reserved characters in HTML are replaced with "character entities". Some common characters that you might want to use are presented in the table below.
| | non-breaking space | |
| < | < | less than |
| > | > | greater than |
| & | & | ampersand |
| " | " | double quotes |
| © | © | copyright |
Quotes, for example, are used when we use attributes (like "style"), so we want a way to escape quotes. The only thing we need to explain at this point is the non-breaking space character. It's basically something that we use when we want a space that won't go into the next line (like, for example, with "150 kph"). It's also used when we want to have several spaces between words (instead of just one).
Comments
Not everything that you put inside the HTML code has to be presented to the user. In HTML, we can add comments - that is, text that is only visible inside the code, but isn't displayed on the web page. Comments can help document your source code, inform other developers that help with your web application, and more.
Comments start with "<!--" and end with "-->". They may span multiple lines, and may contain any kind of text.
<!doctype html>
<html lang="en">
<head>
<title>Entities and comments</title>
</head>
<body>
<!-- here is an example with entities -->
<p>We believe that 5 > 2. We do.</p>
</body>
</html>
Don't use comments for everything. Your code should be easy to read by itself - you can use formatting (whitespace, tabs, new lines) and correct tags to achieve a lot.
Forms
We have shown above how you can display data using various elements (paragraphs, tables, images, etc). However, we often have the need to get data from users - their name, email, credit card information, etc. The HTML element <form> can be used to define a form that can collect user input.
Inside the form, we can use various elements: input (for names, emails, checkboxes, and other one-line text fields), select (for a dropdown menu), textarea (for multi-line text), and buttons (like, for example, a "submit" button).
For the elements where the user will enter or select data, we define a "name" attribute, which we can later use to view the data entered in that element. Let's see an example with a simple form:
<!doctype html>
<html lang="en">
  <head>
    <title>HTML Forms</title>
  </head>

  <body>
      <p>Please fill the following form:</p>
      <form action="/data_goes_here.html">
            First name:
            <input type="text" name="first_name" /><br />
            Last name:
            <input type="text" name="last_name" /><br />
            Gender:
            <select name="gender">
                <option>Male</option>
                <option>Female</option>
            </select><br />
            Notes:
            <textarea name="notes" />
      </form>
  </body>
</html>
We have used self-closing tags (discussed earlier in this post) for the input and textarea elements. The <br /> tag is used to insert a new line break.
Notice the "action" attribute in the code above. It tells the browser where the form data should be sent (i.e. to which URL). A backend handler is then created that manipulates and stores the sent data. For now, we will only discuss how forms can be displayed - the actual handling of the sent data is done at the backend side - which we will discuss in another post.