Requesting data from an UWP app
Published on 2018-06-17
Web applications, mobile applications and desktop applications need to load data from remote sources. For example, news applications need to fetch the latest news, trading apps need to load the latest currency conversion rates, etc. In this blog post, we are going to discuss how you can use the WebRequest class to load data for your UWP desktop application.
The demo that we're going to build will feature the latest air quality data from OpenAQ, which is a platform that contains (at the time this post has been written) more than 8,000 locations in 65+ countries. Data is gathered and aggregated from 100+ government level and research-grade sources.

I've went with this example because the API that we're going to use doesn't require authentication, signup or payments. This means that creating the demo application doesn't require that you do anything else, apart from the steps that are written below. So, let's get started.
Initial setup
If you haven't created any UWP applications before, then please start by reading through one of our earlier posts (for example, this one), as it mentions the required IDE for building UWP applications. After you have an IDE like Visual Studio setup, start by creating a new project by following the standard steps of building a Blank Universal Windows app.
Next, open the MainPage.xaml file by double clicking on it from the Solution Explorer. Then, from the toolbox on the left, drag a WebView component inside the app (I've chosen a WebView in order to show the power we have with UWP). Additionally, you may want to drag a TextBlock, in order to show information to the user on what the app is about. From the properties window on the right, I've changed the contents inside the TextBlock to "Air Quality Data", and dragged the label above the WebView.
Using the same procedure as before, let's setup a name for the WebView component. A name will allow us to modify the contents of the WebView element from our source classes using the C# programming language. (If you don't remember how to name an element, let's just repeat that you should add an "x:Name" property to the WebView element by editing the source code of MainPage.xaml - i.e. add x:Name="airQualityData" to the line starting with "<WebView". For any other issues, please consult the previous blog post linked above)
A look at the data
Before we load the data, let's make sure we understand what we're going to get. By visiting the documentation page of OpenAQ available at https://docs.openaq.org/, we can notice that the loaded data will look something like this (please note I'm asking for data about London here). You should focus your attention on the "measurements" data.
{
  "meta": {
    "name": "openaq-api",
    "license": "CC BY 4.0",
    "website": "https://docs.openaq.org/",
    "page": 1,
    "limit": 100,
    "found": 19
  },
  "results": [
    {
      "location": "Camden Kerbside",
      "city": "London",
      "country": "GB",
      "distance": 5258431.218329604,

      "measurements": [
        {
          "parameter": "no2",
          "value": 69,
          "lastUpdated": "2018-07-09T17:00:00.000Z",
          "unit": "µg/m³",
          "sourceName": "DEFRA",
          "averagingPeriod": {
            "value": 1,
            "unit": "hours"
          }
        },

        {
          "parameter": "pm25",
          "value": 15,
          "lastUpdated": "2018-07-09T17:00:00.000Z",
          "unit": "µg/m³",
          "sourceName": "DEFRA",
          "averagingPeriod": {
            "value": 24,
            "unit": "hours"
          }
        },

        {
          "parameter": "pm10",
          "value": 24,
          "lastUpdated": "2018-07-09T17:00:00.000Z",
          "unit": "µg/m³",
          "sourceName": "DEFRA",
          "averagingPeriod": {
            "value": 24,
            "unit": "hours"
          }
        }
      ],
      "coordinates": {
        "latitude": 51.54421,
        "longitude": -0.175269
      }
    }
  ]
}
Please note that we're presenting just the data about "Camden Kerbside" here, but there will be multiple locations in London for which we have data. We want to present all of those inside a table. The actual API call to make is this one: GET https://api.openaq.org/v1/latest?city=London.
Requesting the data
It's time to load the data from the remote location, and present it inside the WebView (please note I've used the name "airQualityData" to refer to it above, by setting the x:Name property). To load the data, we can use the WebRequest class. We can make the actual call inside the OnNavigatedTo event in the MainPage.xaml.cs file. That method is invoked when the page is shown to the user (which is perfect for us, because that's when we want to show the fetched data).
In that method, we're going to add just a couple of lines that call a function from a new class that I'm going to name "AirQualityAPI". The actual fetching of data will occur in the AirQualityAPI class. Please note that you can create a new class from the Solution Explorer available on the right side of the screen in Visual Studio. The OnNavigatedTo function can look something like this:
protected override void OnNavigatedTo(NavigationEventArgs e)
{
    WebView view = airQualityData;

    AirQualityAPI api = new AirQualityAPI();
    api.FetchDataAndDisplay(airQualityData);
}
Here is the code for the new AirQualityAPI class. Note the use of WebRequest for loading data, and the updates to the WebView ("view"). The WebRequest will load the data asynchronously (in a separate thread, without blocking the current one), because it's often a good idea to make these kinds of long lasting calls inside another thread. (In practice though, you need to understand how the specific class/method you call works and whether or not it may block a thread for a long time.)
using System;
using System.Collections.Generic;
using System.Linq;
using System.Text;
using System.Threading.Tasks;
using Windows.UI.Xaml;
using Windows.UI.Xaml.Controls;
using System.Threading;
using System.Net;
using System.Runtime.Serialization;
using Windows.Data.Json;
using System.IO;
using Windows.UI.Core;

namespace AirQualityApp
{
    class AirQualityAPI
    {

        public void FetchDataAndDisplay(WebView view)
        {

            WebRequest request = WebRequest.Create("https://api.openaq.org/v1/latest?city=London");
            Task<WebResponse> dataTask = request.GetResponseAsync();
            dataTask.ContinueWith(webResponse =>
            {
                JsonObject root = null;

                using (Stream stream = webResponse.Result.GetResponseStream())
                {
                    StreamReader reader = new StreamReader(stream, Encoding.UTF8);
                    String responseString = reader.ReadToEnd();

                    root = Windows.Data.Json.JsonValue.Parse(responseString).GetObject();

                    var tableRows = new List<string>();
                    var results = root["results"].GetArray();

                    foreach (JsonValue location in results)
                    {
                        string row = "<tr>";
                        row += "<td>" + location.GetObject()["location"].GetString() + "</td>";
                        row += "<td>" + location.GetObject()["city"].GetString() + "</td>";

                        //show just one measurement (though, there can be more for different parameters)
                        JsonObject measurement = location.GetObject()["measurements"].GetArray().GetObjectAt(0);
                        row += "<td>" + measurement["value"].GetNumber() + " " + measurement["unit"].GetString() + "</td>";

                        row += "</tr>";
                        tableRows.Add(row);
                    }

                    Windows.ApplicationModel.Core.CoreApplication.MainView.CoreWindow.Dispatcher.RunAsync(CoreDispatcherPriority.Normal,
                        () => { view.NavigateToString("<table cellpadding=\"20\">" + String.Join("\n", tableRows) + "</table>"); });
                }
            });
        }
    }
}
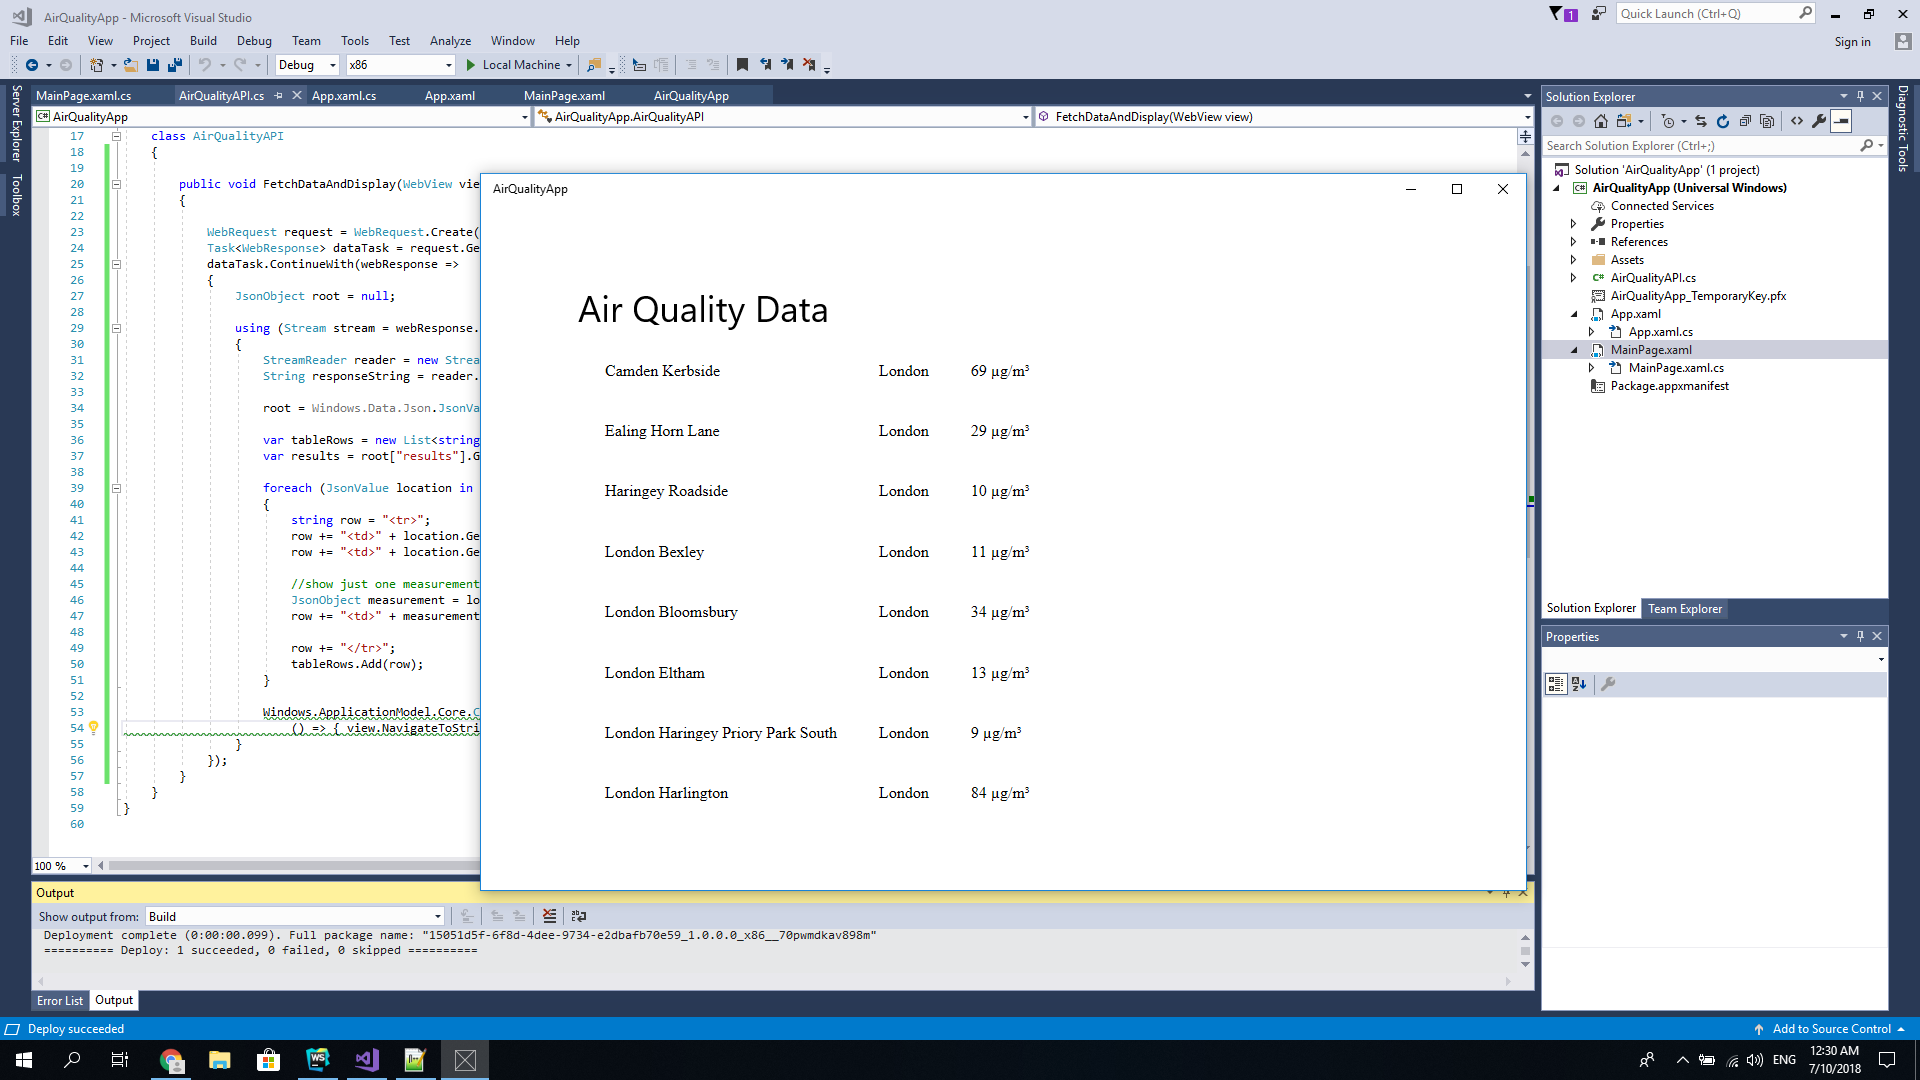
I did my best to put everything inside a single file. Of course, it's better not to mix HTML code and C# as I did above, but instead to separate the HTML contents inside a new file (that way, it would be easier to define CSS rules as well, and make things look prettier). The app should now look something like this (see image below).

If you can't see any data at this point, make sure your WebView (inside the XAML file) has a width and height set (otherwise it will be invisible). Similarly, make sure you're actually loading the data by attaching a breakpoint somewhere inside the AirQualityAPI class.
Finally, it's worth pointing out that you can download and parse any kind of XML, JSON or textual data. Given the amount of information available online, it's up to you now to try and invent new ways of presenting that data to users. Images, charts, tables, and grids are just some of the awesome ways in which you can show information to users in UWP applications.
